Staggered 1 3 Offset Tile Pattern
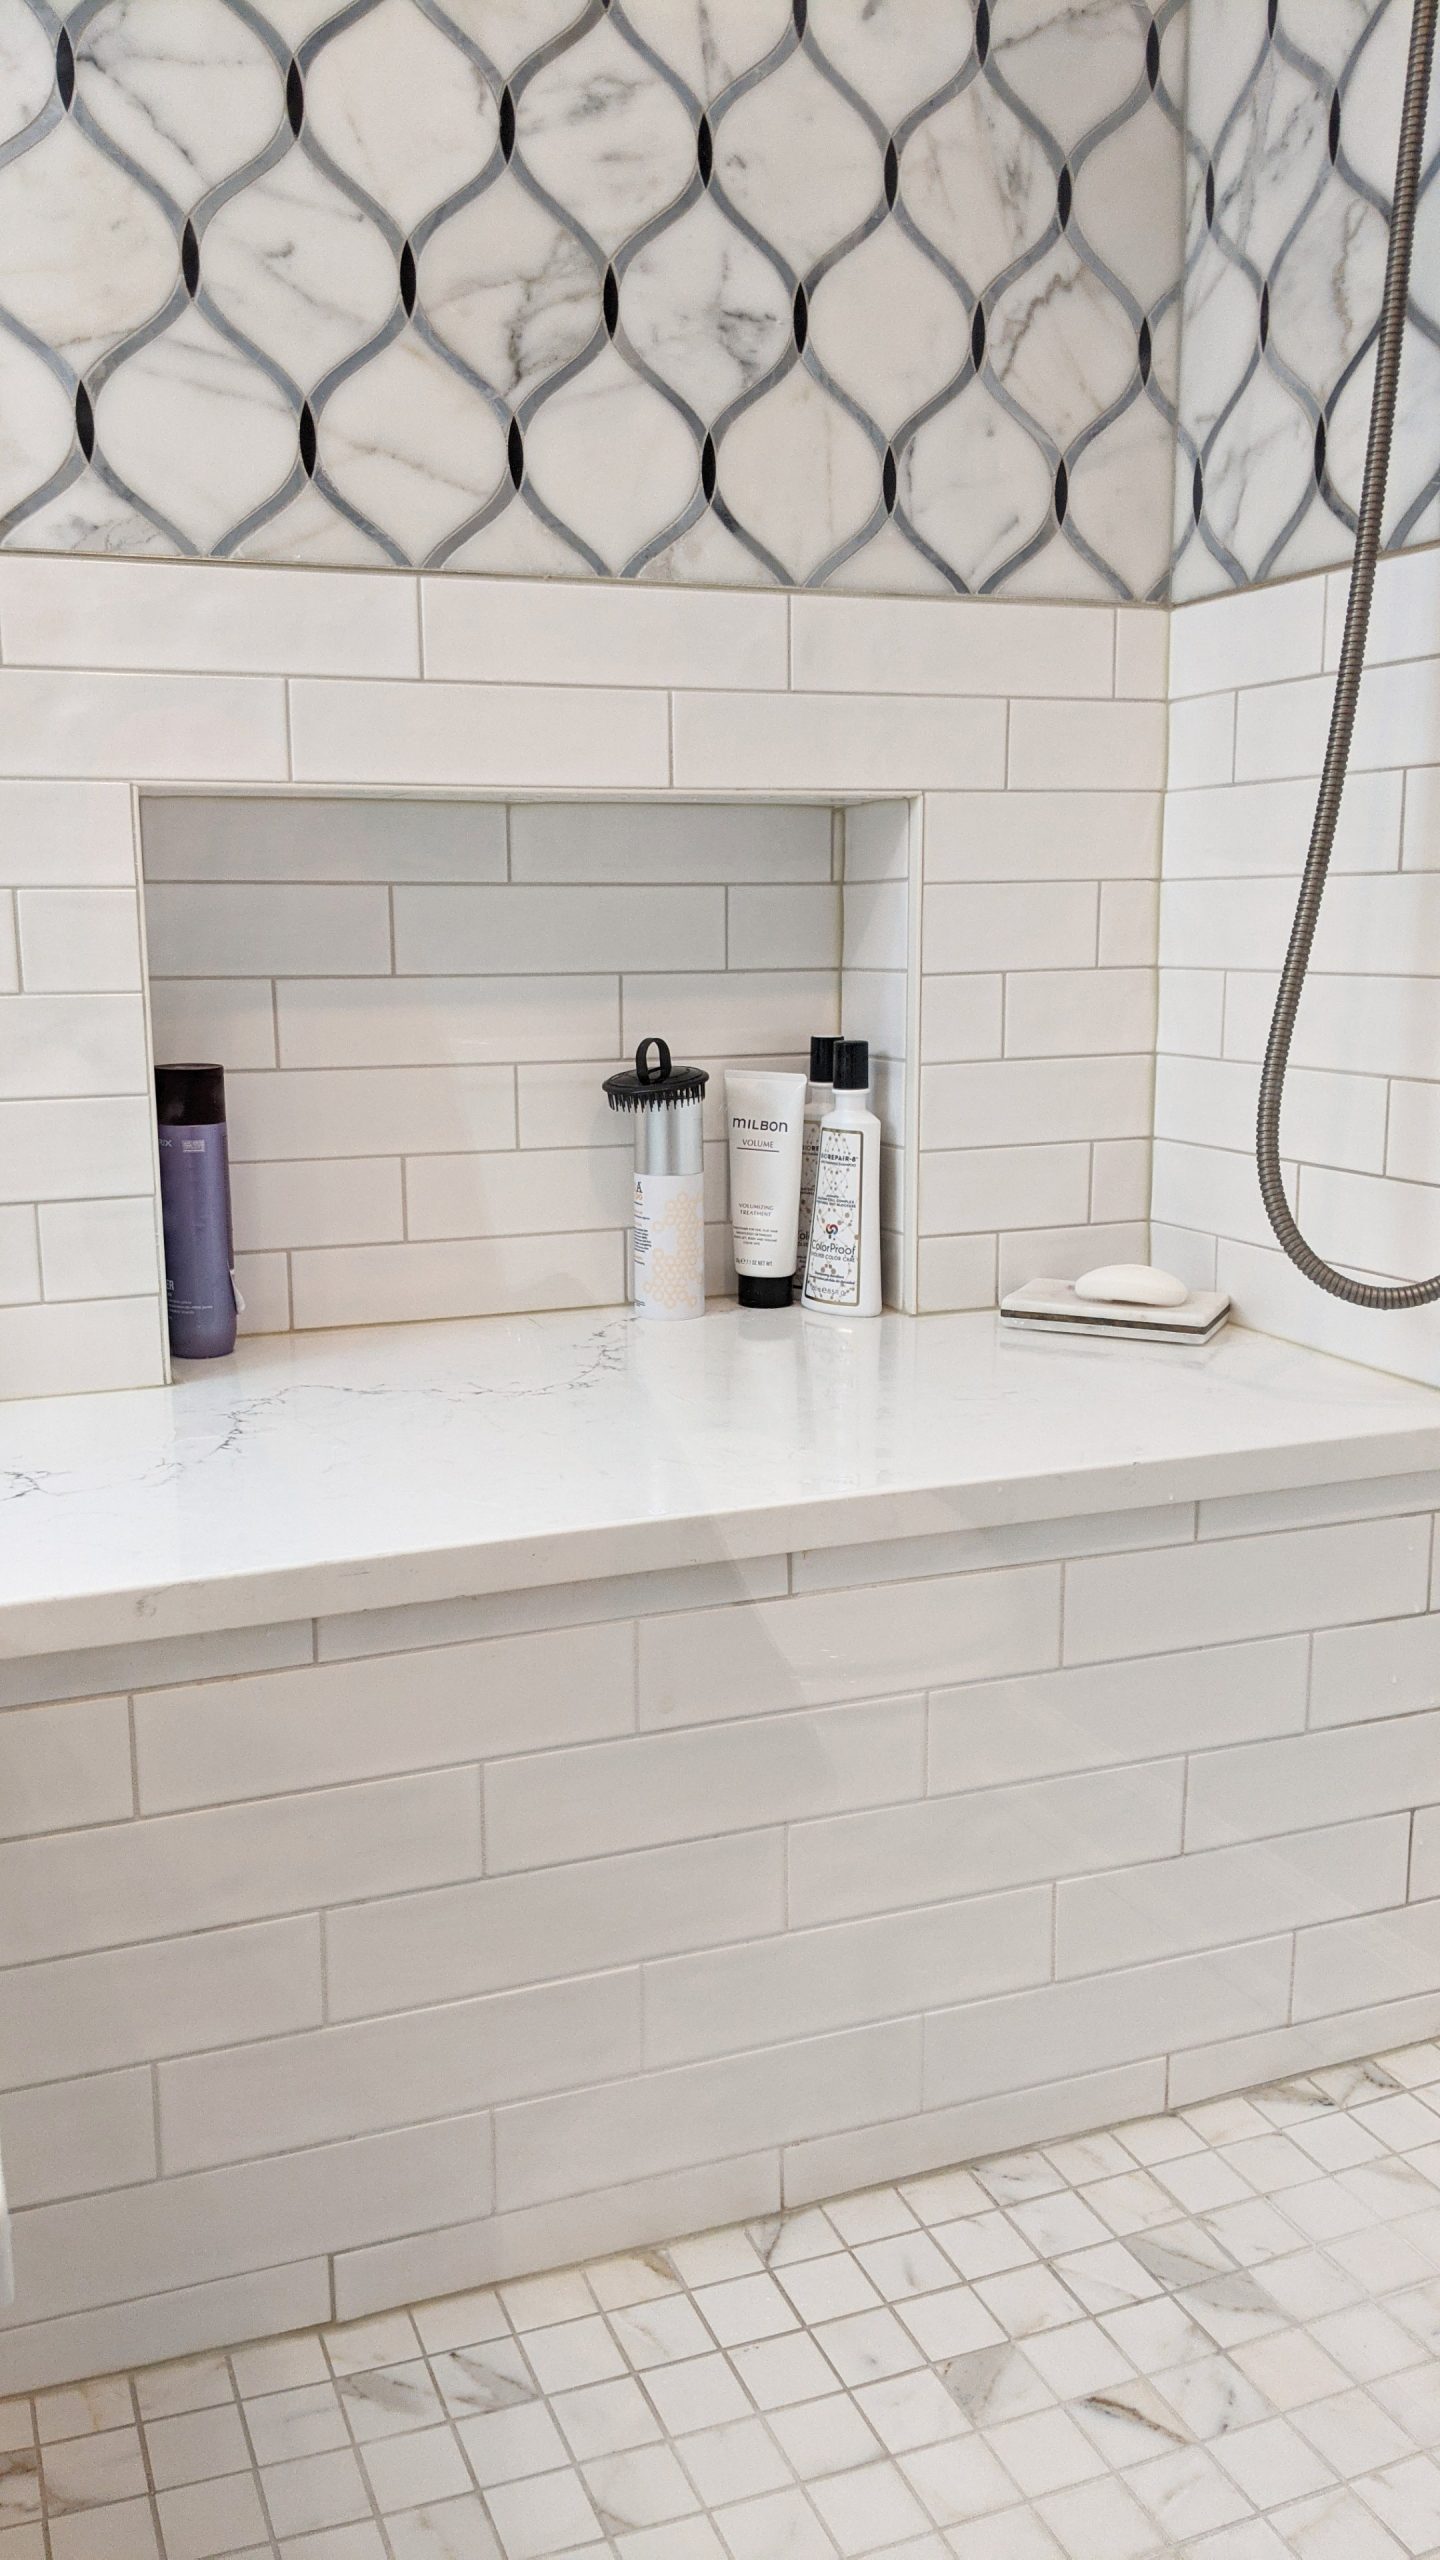
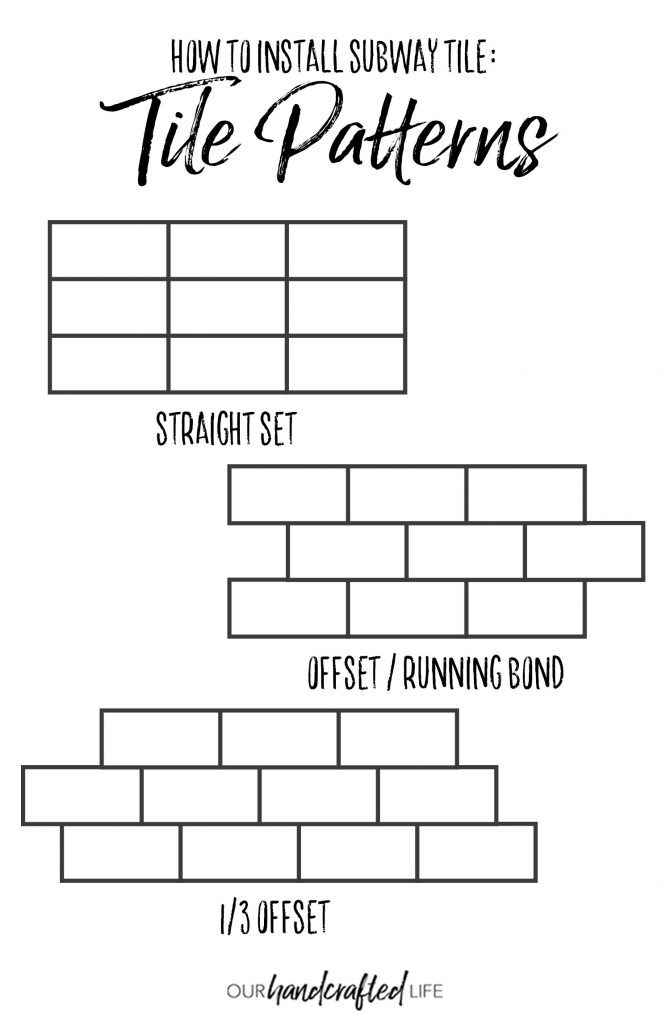
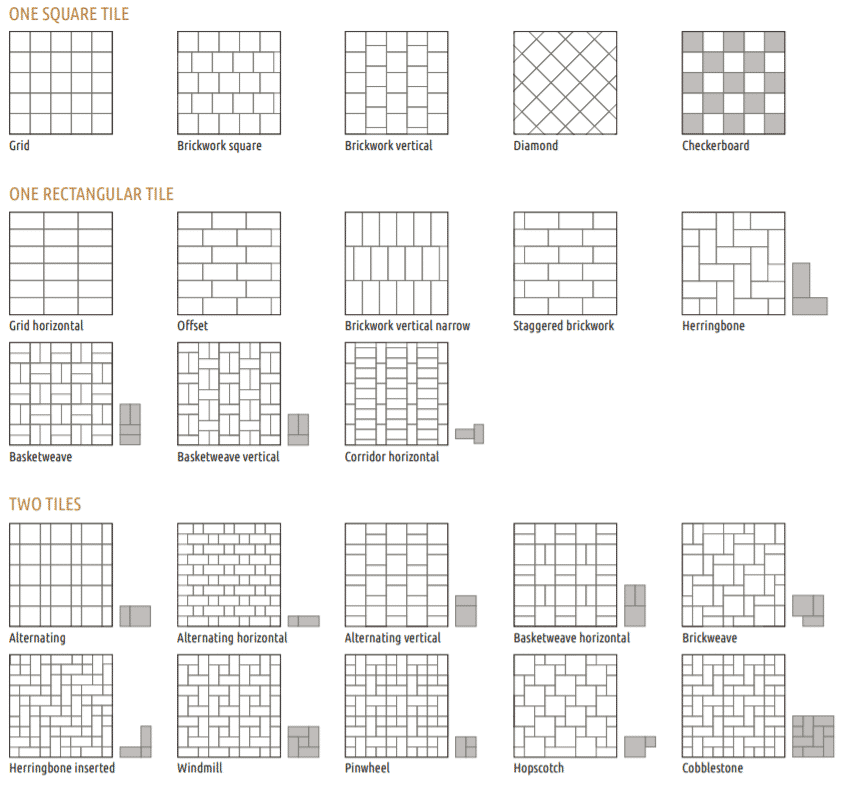
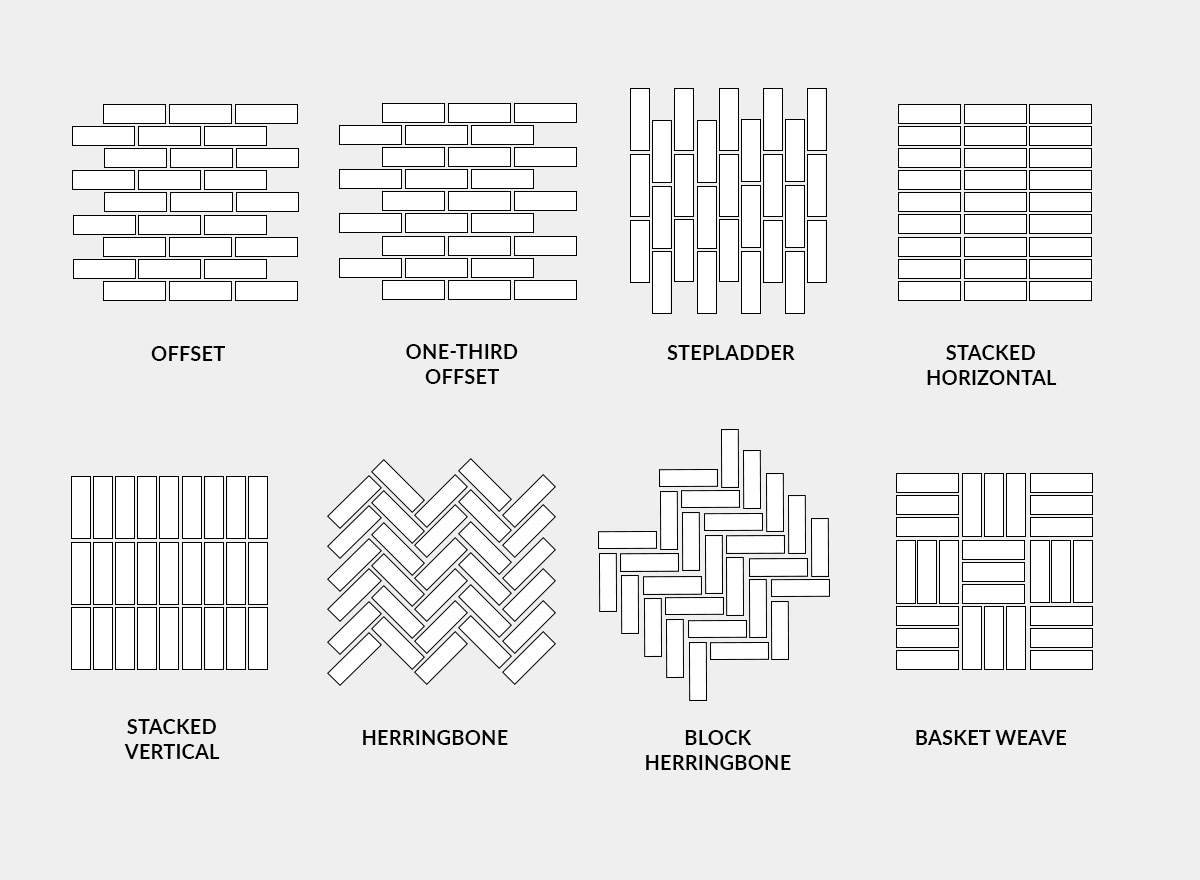
Staggered 1 3 Offset Tile Pattern - This unique tile arrangement is beautifully simple yet capable of creating a stunning visual effect that enhances the aesthetic appeal of your interiors. Web i am using 12 x 24 inch tiles with 1/8 inch grout lines. Web transform your space with the staggered joint floor tile pattern by belk tile, designed to infuse elegance and dynamic symmetry into any room. It’s not a difficult pattern to achieve. On a 1/3 offset, this usually offers more than one alternative for centering to avoid small cuts at the ends of the field. Web yet it’s one of the best ways tile can be used to express a personal style. However, there are many ways to stagger tile that can open up a small space, add design that draws the eye or add texture and. Web also known as the “offset pattern,” this is a pattern that’s relatively easy to achieve. Web a staggered tile pattern seems straightforward. I just don't know how to do this, where to start or where to cut etc. If that doesn’t vibe with your style, you could switch them and do a stacked pattern on the wall and an offset layout on the floor. However, there are many ways to stagger tile that can open up a small space, add design that draws the eye or add texture and. Web each tile in this pattern offsets the tile below it by one third of its length, creating a staggered diagonal effect. For tiles 300x600 or larger only ever use a staggered brick bond as this will avoid lipping. Web transform your space with the staggered joint floor tile pattern by belk tile, designed to infuse elegance and dynamic symmetry into any room. Web this 88 sf bathroom floor got 12 x 24 in. You'll end up with significant lippage at best, and with a basket weave appearance at worst. Web getting ready to install large format tile such as 6x24 or 12x24 tile? It’s all about lining up the edge of the tile to the center of the tile that is below it. You simply line up the edge of the tile to the center of the tile below it. If that doesn’t vibe with your style, you could switch them and do a stacked pattern on the wall and an offset layout on the floor. For tiles 300x600 or larger only ever use a staggered brick bond as this will avoid lipping. A look at the different types of staggered tile patterns. It’s all about lining up the edge. Web shake up a typical offset tile pattern by turning it on its head! Web it's because the tile have a slight bow in them, and if you stagger them at 12 you'll be setting the highest part of the tile, the middle, next to the lowest part of the adjacent tile, the ends. I just don't know how to. Simply offset the tiles by an inch or two, and it's done. For tiles 300x600 or larger only ever use a staggered brick bond as this will avoid lipping. Web a staggered floor layout is also known as an offset pattern. However, there are many ways to stagger tile that can open up a small space, add design that draws. Web for a fresh take on your traditional or transitional kitchen or bathroom, a 1/3 offset tile pattern on the backsplash, or the floors adds interest and that polished, designer feel. It’s not a difficult pattern to achieve. We suggest using one third offset when designing with tile that is 8″ x 16″ or larger. A look at the different. Web for a fresh take on your traditional or transitional kitchen or bathroom, a 1/3 offset tile pattern on the backsplash, or the floors adds interest and that polished, designer feel. Web a staggered tile pattern seems straightforward. Web consider using an offset pattern on the wall to highlight the subtle shades in the individual subway tiles and a grid. Download our helpful pdfs for diy installation and tile pattern preferences. Web a staggered floor layout is also known as an offset pattern. If that doesn’t vibe with your style, you could switch them and do a stacked pattern on the wall and an offset layout on the floor. Web also known as the “offset pattern,” this is a pattern. It creates strong diagonal lines in the pattern and is often used instead of the basic offset pattern with larger tiles to hide imperfections, like in this danish home from nordic design. It’s not a difficult pattern to achieve. Use a measuring tape and chalk lines to mark the centerline of the room and establish the starting point for the. Web the easiest way to adjust for small tiles is usually to shift the layout from the center of the tile to the center of the grout joint. Web getting ready to install large format tile such as 6x24 or 12x24 tile? Web it's because the tile have a slight bow in them, and if you stagger them at 12. Web for a fresh take on your traditional or transitional kitchen or bathroom, a 1/3 offset tile pattern on the backsplash, or the floors adds interest and that polished, designer feel. This pattern is especially popular in powder rooms and kitchen backsplashes. We suggest using one third offset when designing with tile that is 8″ x 16″ or larger. Web. You simply line up the edge of the tile to the center of the tile below it. Web this 88 sf bathroom floor got 12 x 24 in. Web shake up a typical offset tile pattern by turning it on its head! Web consider using an offset pattern on the wall to highlight the subtle shades in the individual subway. Web yet it’s one of the best ways tile can be used to express a personal style. Web shake up a typical offset tile pattern by turning it on its head! If that doesn’t vibe with your style, you could switch them and do a stacked pattern on the wall and an offset layout on the floor. Web each tile in this pattern offsets the tile below it by one third of its length, creating a staggered diagonal effect. Web these longer planks are suitable for linear layouts like offset, staggered and stacked as well as angled patterns like herringbone. Web also known as the “offset pattern,” this is a pattern that’s relatively easy to achieve. We suggest using one third offset when designing with tile that is 8″ x 16″ or larger. Use a measuring tape and chalk lines to mark the centerline of the room and establish the starting point for the tiles. Web msi’s tile patterns tool lets you select one, two, or multiple sizes of tile before picking the desired pattern and learning how many tiles are needed. This unique tile arrangement is beautifully simple yet capable of creating a stunning visual effect that enhances the aesthetic appeal of your interiors. For tiles 300x600 or larger only ever use a staggered brick bond as this will avoid lipping. On a 1/3 offset, this usually offers more than one alternative for centering to avoid small cuts at the ends of the field. This pattern is especially popular in powder rooms and kitchen backsplashes. It’s not a difficult pattern to achieve. A look at the different types of staggered tile patterns. You'll end up with significant lippage at best, and with a basket weave appearance at worst.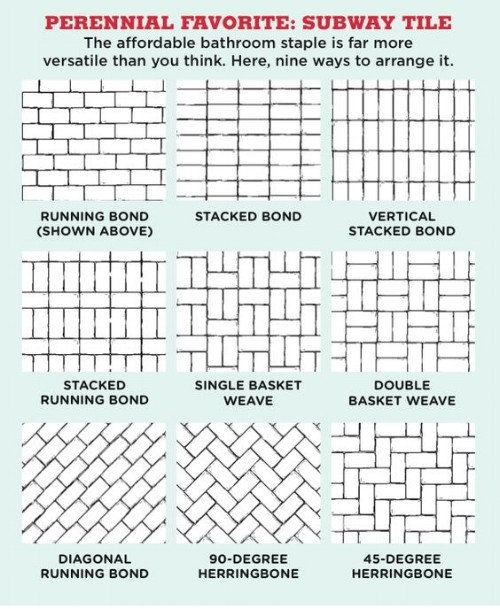
Staggered Brick Bond Tile Pattern / Sometimes the offset is one third

Staggered Tile Floor Patterns Flooring Ideas
When it Comes to Tile, Good Things Come in Thirds

Staggered 1/3 Offset Tile Pattern Pattern.rjuuc.edu.np
How to Install a Subway Tile Backsplash in the Kitchen Our
How To Layout Tile Floor Patterns Flooring Site
1/3 Staggered Tile Pattern and 4 Other Tile Patterns to Know

20+ 33 Offset Tile Pattern The Urban Decor

Creative Subway Tile Patterns and Interior Design Ideas Subway tile
Tile Layout Patterns & Design Ideas Porcelanosa
Web Staggered Bond (Sometimes Called Stretcher Bond, Offset Or 1/3 Bond) Is Very Similar, Except The Tiles Overlap The Tile Above By At Least One Quarter Instead Of Half, Creating A Softer, More Natural Look.
Web A Staggered Tile Pattern Seems Straightforward.
Web The Team Discusses The Proper Offset Patterns For 12”X24” Tile And Whether It Is Better To Purchase Precut 4”X12” Or Have It Cut By Installers From 12”X24”.
Porcelain Tile Installed In A Third/3Rd Pattern/Design.
Related Post:
